

How To Draw Arms Behind Back


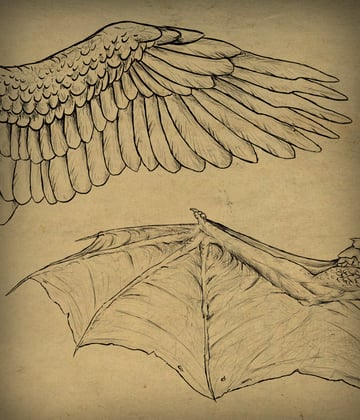
There are a few things every artists should exist able to draw, with wings existence certainly one of them. In this tutorial I'll show you how birds' and dragons' wings are built, why they're built this manner and how to create believable poses for them.
i. Basics of Wing Anatomy
Pace one
Wings evolved from the same structure as an arm, so they're quite like. Just expect at the plan below - as y'all can come across, it's mostly the hand construction that makes the difference:
- Birds have well-nigh of the hand basic united in simple shapes.
- Bats' fingers are very long, they besides start directly on the wrist.
- Both birds and bats use their thumbs for precise maneuvers.


Step 2
When the wing are folded, all of the bones try to come closer to each other.


Footstep 3
We can simplify the plan of the basic to better understand the way it's working. Likewise, these basic lines are all you need to get-go a right picture of wings!


Footstep iv
Since wings are then similar to your arm, why don't you use it to notice a good pose? Try to flap your arms, spread your fingers - imagine you have feathers of a membrane betwixt them. It volition assist you understand what poses are natural (therefore, realistic when drawn).


2. The Structure of Feathered Wings
Step ane
The whole bird's arm doesn't build the wing. It actually starts merely before the elbow.


Step 2
Have you ever seen featherless chicken's wings? This is the function built of bones, muscles and skin. To build real wings, we demand to attach feathers to this naked arm.


Step 3
The feathers have dissimilar directions according to the office of arm they're fastened to.


Step iv
The offset "layer" of feathers you should describe is lesser and median secondary coverts. These are the little scale-like feathers that comprehend the upper part of the wing. They end with alula - a minor cluster of feathers attached to the thumb. You can treat alula just like a bird's pollex for easier understanding.


Footstep five
Even when placing these little scaly-feathers you lot need to recollect about correct direction. But that's actually the only rule you need to remember at the moment; y'all can depict them quite chaotically and lightly. In that location'southward no need to draw them i by one, they're so small and tightly placed that usually you tin can't see single feathers.


Step 6
Before we become any further, you lot demand to learn one important rule that unremarkably amateurs are unfamiliar with. A wing has two sides - superlative and bottom. The feathers overlap each other in a non-random way. From the tiptop view y'all can see only outer edges of the feathers, from the bottom - just the inner ones.


Step seven
Since you know the rules of management and overlapping, you tin can start to draw the primary coverts. Here come up two new rules:
- Don't draw the feathers pointy - the ones used for flight are always rounded;
- The closer y'all are to the joint, the shorter the feathers.


Pace 8
This office of a wing is called greater secondary coverts. They're pretty easy to draw.


Footstep 9
The greater secondary coverts should also be placed behind the elbow point, though they usually beginning to blend with belly/back feathers hither.


Footstep 10
One time you've covered all the arm with feathers, time to attach the most important ones. The "hand" feathers are called primaries. We tin see 2 joints here - on the wrist and where the fingers starts. The feathers fastened to the fingers are dandy for precise maneuvers. Large birds (like eagles) have them slotted. They give them more agility and look awesome, too.


Step 11
The rest of the feathers of this function are attached to the wrist-palm area. They're big and rounded.


Pace 12
The secondaries are attached to the forearm. They look just like a bigger re-create of greater secondary coverts above them.


Step 13
The tertials are an element blending the wing with the body. When you draw a wing from the top view, draw them equally a cluster of long feathers. From the bottom view, they'll be but partially visible and covered by a part of secondaries.


Step xiv
That's the fully sketched fly.


3. The Structure of Webbed Wings
Step 1
Bats' wings aren't as complicated as birds', but they're yet fascinating. Their artillery are very similar to humans', as in that location's a whole hand of long fingers. All the fingers are connected with each other and the body with a membrane. When bats spread their wings, the membrane is stretching - that's why it doesn't crease then much when the wings are folded.


Footstep ii
Merely hey, who actually draws bats? They're surely cute, simply... let's be honest, information technology'southward their wings that interests us. Wings that we can use for our dragons and demons! Bad news is you are not able to describe an anatomically correct dragon fly. Good news is - nobody can! Dragons merely don't be, and if they existed, they could use dissimilar mechanics of flight (and probably they wouldn't exist able to wing majestically as we imagine them). However, I tin can give you a bit of advice to draw them as realistically as possible.
First, you lot'll need strong arm muscles. When the trunk is well-congenital, the wings must be equally strong to acquit it. You can utilize human arm anatomy for reference. Likewise, it'south of import to give your dragon very big back muscles.


Step three
When drawing the "finger", it's important to stress the joints. They requite a realistic feel and let yous attach the membrane correctly.


Pace 4
In that location's ane mistake a lot of people practise (me too, in the past!). It's probably considering a bat's arm isn't as long as a dragon'southward (at least, equally nigh of united states imagine them). When the dragon's arm is bending, we tin can see a fold under the elbow. Hence the conclusion at that place'due south a bone deforming it, just like the bat's foot deforming the membrane of the tail. Putting a bone here doesn't make too much sense, yet a lot of professional person artist do it. Plain, information technology'south not forbidden, but you need to ask yourself if your dragon really needs it!


Pace five
Embrace the arm with a membrane. As you can encounter, the arm - bones and muscles - is placed inside the membrane, not on information technology. That's why you should blend the fingers into the fly. Also, the membrane should be stretched the almost betwixt joints.
When it comes to tears, they look quite realistic (they say wings are used), but they need to be as modest as possible - every bit they would drastically suspension the lift.


Pace 6
Below is how you can practise it:


Step vii
A membrane isn't a dead cloth, it needs to be nourished by claret like every other organ. A web of veins volition add a realistic experience to your drawing. Just call up - big claret vessels spread into thin capillaries. They beginning on the arm, non somewhere at the edge of the wing. If they did, every little tear would lead to serious bleeding!


Step 8
When drawing the veins, keep them light and almost invisible. A nice flim-flam is not to depict all their edges, and stress only some of them.


Step 9
You tin can also add together skin texture to the wings. The easiest i is a wide cross-hatching. Alter its density according to the membrane's stretching - the bigger tension, the thinner the texture.


The dragon wing is done!


4. Flying Theory
Step 1
To fully understand how to draw wings realistically in every position you demand to first learn how they piece of work and what'south the purpose of their shape. Abreast the obvious learning do good, isn't it nice to know how things work?
So, how is it a bird or a bat tin can fly? Let's start from the offset of every flight - the take off. Our birdie - let's call him Bob - is sitting on a pole. The little circles effectually him are the air particles. When at that place's no current of air, they don't move.


Step 2
Bob just spread his wings and jumped into the air! The gravity is dragging him down for a moment, just he has his ways to fight it...


Step 3
Bob uses his strong arm muscles to flap his wings. They're so wide that they move all the air particles on their fashion under Bob'southward body.


Pace iv
Just hey, at present there's an empty expanse over Bob's dorsum, and the particles nether his body are squashed! Air particles similar balance. They want to be placed evenly in the infinite, without any vacuum spots. So, our squashed air particles fly up to fill the empty area. And when they do it, they button Bob's body up and forrard.


Footstep five
Merely that'due south non enough to make Bob fly. Flapping just makes him moving fast forward and thus generate wind (air movement) that the bird can use to create more elevator.
To put it just:
- When a bird moves through the air (even falling), there'southward a lift created under its body - it's pushing it upwardly. The faster the motion, the stronger lift. At the same fourth dimension, gravity is pulling the bird down.
- As we accept noticed, flapping creates lift too.
- Thanks to the special wing's shape, air particles hitting the wing need to fly faster over the wing than under information technology. Gravity has less fourth dimension to strike this way.
What practise we need elevator for:
- When lift is stronger than gravity (weight), bird is pulled upwardly.
- When lift is equal to gravity, bird glides/flies.
- When elevator is lower than gravity, bird falls down (and needs to flap - create more lift - to stay aloft).


5. Wings in Motion
Step one
It'due south of import to know wings don't move simply up and down when they're flapping. The only purpose of this action is to push the air down, then the upstroke serves merely one point - to get the wings upward again for another down stroke. What does it mean?
- During the down stroke wings are wide spread, they try to push as much air as possible.
- During the upstroke wings are slightly folded, and the primaries are separated. They don't come dorsum the same way, they're actually sneaking back not to break freshly created lift.
This will apply to bats/dragons besides.


Step ii
You can see the rotation clearer from the back/front. Take a good await at both downwardly stroke and upstroke. Also, notice how air motion changes the shape of primaries' tips.


Step 3
Folding a fly of a bird isn't that difficult once yous learn ane simple dominion nearly information technology - primaries are overlapped with the rest of the wing while folding. That'southward all!


Step iv
Folding a webbed wing is a chip more complicated. You demand to imagine the areas of tension first. They can look like elementary feathers. When the fly is existence folded, the feathers are getting closer to each other, overlapping them.
As it was said before, you don't need to add that many wrinkles to the folded membrane. It should be just less smooth than the fully spread wing.


Footstep v
Once yous know the rules and fly's beefcake, yous can describe them in any position using perspective (yep - you won't avoid learning perspective, information technology's everywhere!). The trick is it'due south e'er best to start with bat wing for a pose, equally the fingers will help you establish the primaries too.


6. Common Mistakes
There are a few mistakes most of usa exercise at some level. They usually come from ignorance - you recall you know how a wing looks, so why wouldn't you lot describe it?
Step ane
Firstly, a wing's arm cannot be fully expanded. There'southward a ligament betwixt the wrist and the shoulder, and it can't expand forever. This applies to both birds and bats.


Step ii
Feathers are rounded, not pointed. Big birds similar eagles can accept slotted feathers in their primaries, simply that'due south the only identify they can exist without breaking the elevator.


Step 3
Another mistake is drawing all the feathers in the aforementioned direction. Every bit we noticed before, it's not how it works! Feathers overlap each other, and they tin't overlap both sides at the same time.


Stride 4
Dragon fans are non innocent either. The almost common error here is drawing the wings completely flat (no joints in the fingers) and forgetting nearly the membrane between the shoulder and the wrist. That membrane is very important for building an aerodynamic shape.


Now You Can Wing!
Now you lot're a wing good! You lot can draw birds, bats, gryffins, angels, dragons and demons with natural, realistic wings. Until side by side time, happy drawing!

Source: https://design.tutsplus.com/articles/taking-flight-a-beginners-guide-into-drawing-wings--vector-15996
Posted by: edwardscompossides.blogspot.com
0 Response to "How To Draw Arms Behind Back"
Post a Comment